The main window
The main window, as the name implies, is the window containing the main components of the Pitivi user interface, namely: the header bar, the toolbars, the timeline and various customizable components (media library, previewer, effects library, transitions library, etc.).
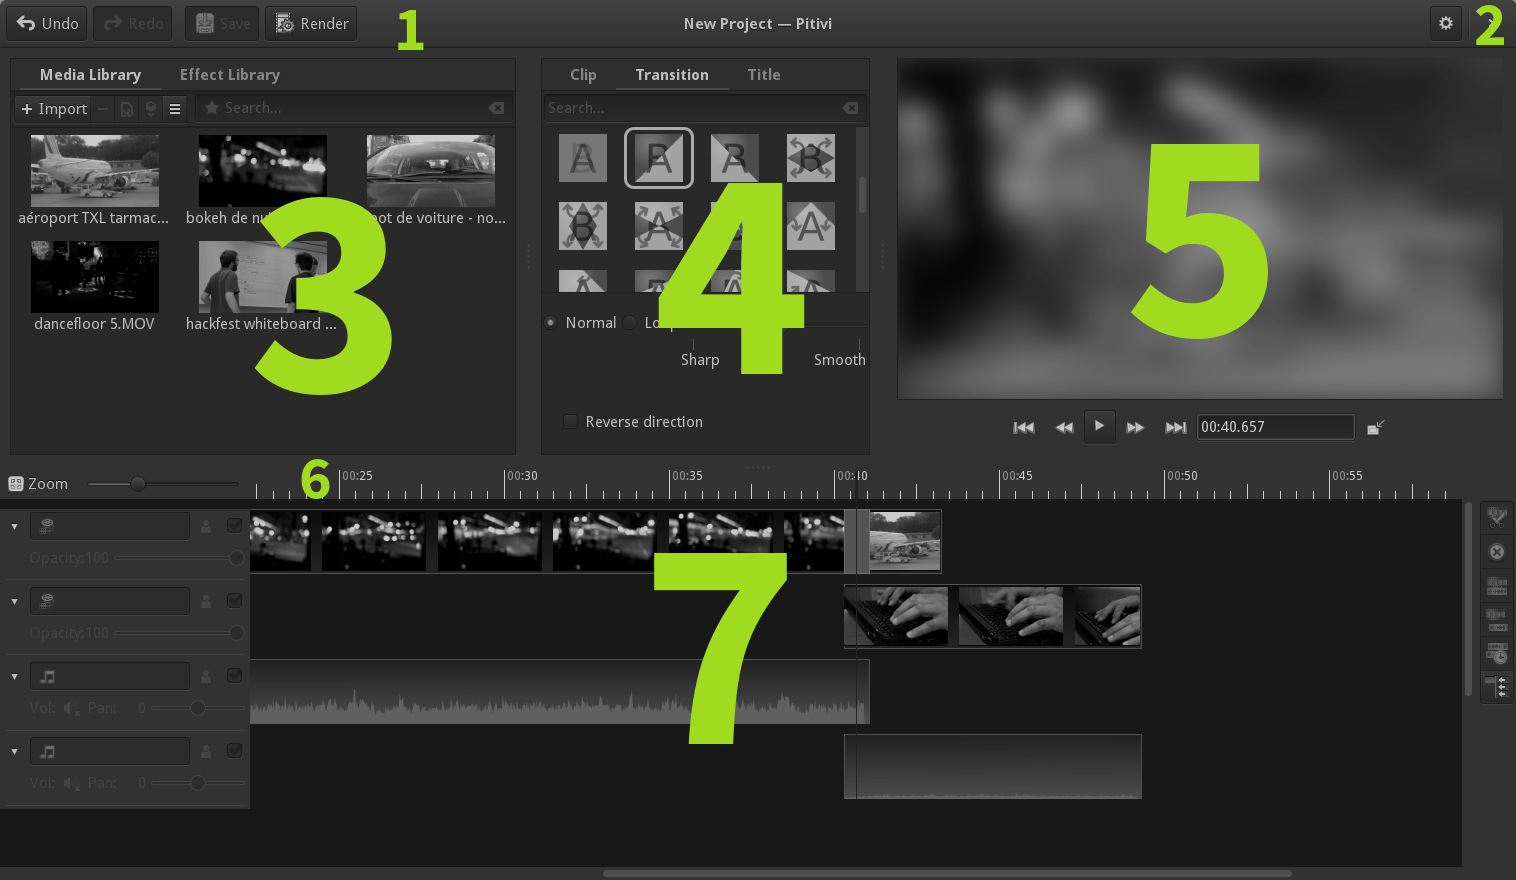
In the figure above, the following areas can be observed:
Header bar and main toolbar buttons
Main menu button
Primary tabs: media library and effects library
Contextual tabs: clip properties, transitions, titles
Viewer
Ruler
Timeline
Resizing the components of the main window
The spaces between components can be clicked and dragged to proportionally resize the respective adjacent components.
Hovering for more information
Hovering the mouse cursor over an element in the main window usually reveals an information tooltip regarding its function.
Header bar
The header bar is a place where basic functions such as Undo, Redo, Save, or Render can be directly accessed. It also contains the main menu button where you can find further functions such as New project, Open project, Project settings or Preferences.
The menu button's contents can be accessed by pressing F10.
Ruler
The ruler plays a crucial role in your interaction with the timeline. First, it represents a time scale providing time measurements (in seconds) for overall orientation. Second, it constitutes the primary surface on which you can move the playhead (and thus, change your position in time). To move your position, click anywhere on the ruler. You can also scrub the timeline by clicking on the ruler and holding down the mouse button while moving. See the section on scrubbing for more details.
The current playhead position is indicated by a red vertical line:

When zoomed in, frames are visually represented as alternating light and dark areas in the bottom part of the ruler. Hovering the mouse cursor over the ruler in this state will reveal an information tooltip with frame number. The amount of time the individual frames take up is based on the project framerate settings.
Timeline
The timeline is the core user interface component that you will use for editing. Vertically, it is divided into layers that can be filled with audio and video clips. Horizontally, it constitutes a time-proportional representation of your project's chronology. Various levels of zoom can be applied to the timeline. However, these apply only to the horizontal (chronological) dimension of the timeline.
See the Understanding layers and Moving around the timeline pages for more information on how to work with the timeline.
Timeline toolbar
The timeline toolbar is located at the right edge of the timeline. It contains basic actions for editing in timeline:
Split clip at playhead position
Delete selected
Group clips
Ungroup clips
Copy
Paste
Toggle gapless mode
Note that most of the actions become available only once a clip is selected (see Selection and grouping for more details). When there is no subject for the action to be performed on, it remains shaded (indicating its unavailability).
Playback toolbar
This toolbar, located below the previewer, contains buttons controlling the playback of the timeline. Options provided by the toolbar are the following:
Play/Pause
Go forward one second
Go back one second
Go to the end of the timeline
Go to the beginning of the timeline
For more information on how to move on the timeline, see the Moving the playhead and Scrubbing sections on the Moving around the timeline page.
Previewer
The previewer displays:
The video frame at the current position of the playhead.
Your project's video when playing back.
A live preview when trimming a clip's beginning/end point.
Detaching the previewer into a separate window
You can detach the previewer into a separate window by clicking the Detach the viewer button in the Playback toolbar. From the separate window, you can play the preview in fullscreen. This will also allow other parts of the main window to take up the space the previewer occupied. You can attach the previewer back by closing the separate window.
Pitivi inhibits the screensaver while playing the video preview.
Left pane
The left pane contains media and effect libraries. You can switch between them by selecting the appropriate tab. The Media Library displays the imported media files in your project and allows you to manage them. The Effect library contains number of audio and video effects applicable to clips.
You can search the libraries by using the text box in the header of each library.
Middle pane
The middle pane contains Clip configuration, Transitions and Title editor. You can switch between them by selecting the appropriate tab. The Clip configuration allows you to activate, deactivate or configure settings of effects applied to a selected clip. Transitions let you pick and configure the transition type when two clips overlap in the timeline. With Title editor you can create new clips with titles or add titles to existing ones.